The Quiltler Quilt is a 60 × 72 inch throw design made with 960 blocks arranged in a straight grid. It uses two distinct fabrics without sashing, allowing the closely set blocks to fill the center before the border frames the layout. You can open the design in Quiltler to study its structure, try new colors, or adjust its size.
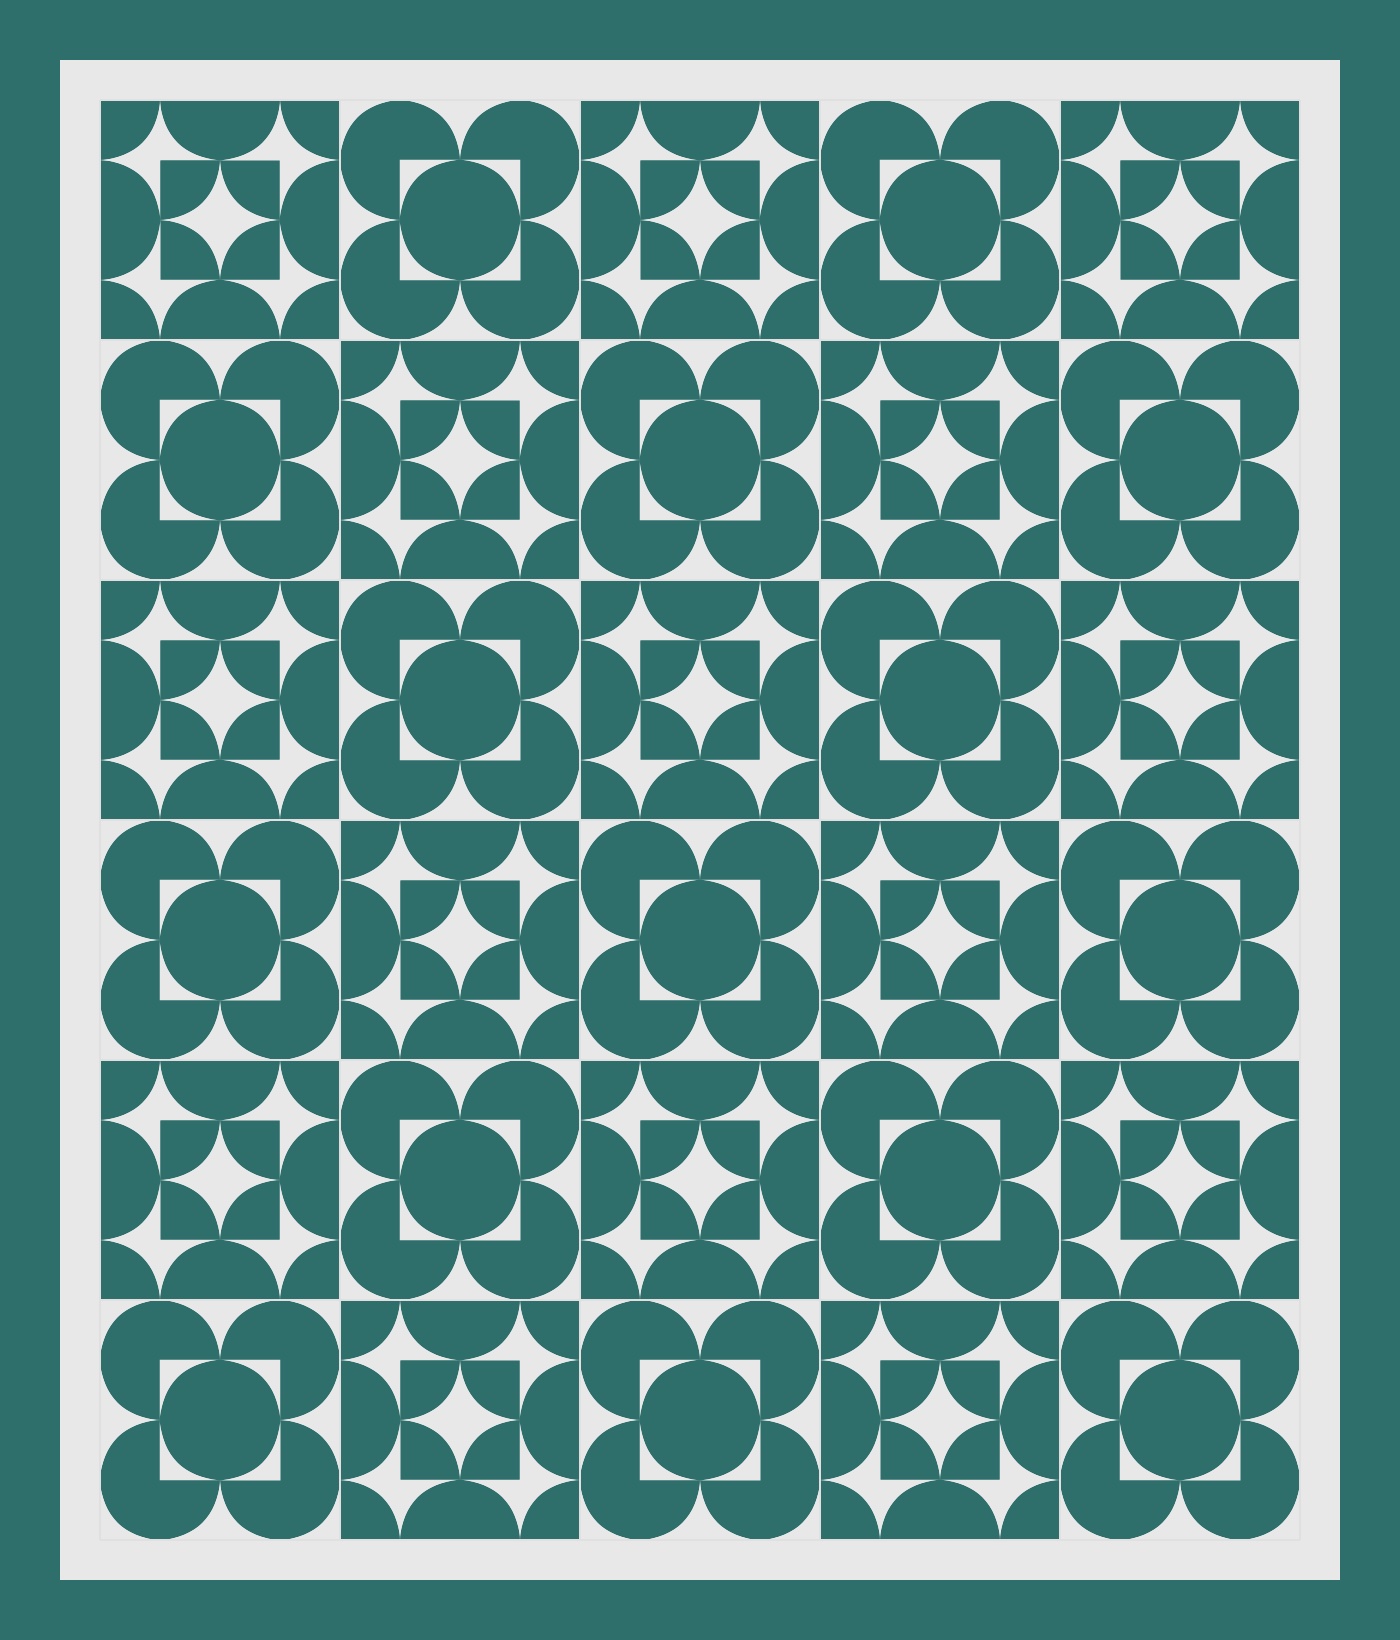
At a glance
- Finished size: 60 × 72 in (throw)
- Blocks: 960, set in a straight grid
- Fabrics: 2
- Sashing: none
- Border: yes
On this page
A closely set two-fabric throw quilt
This design uses a large number of blocks within a straightforward structure. All 960 blocks sit in a straight grid, so the layout is regular rather than offset or arranged on point. With no sashing between them, the blocks meet directly across the quilt center and create a continuous field of repeated units.
Only two distinct fabrics are used in the design. That limited palette keeps the focus on how those fabrics alternate or interact across the grid. You can choose fabrics with a strong contrast to make the individual units easier to see, or test a quieter relationship for a more blended appearance. The live Quiltler Quilt design lets you compare those choices in the existing layout.
A border surrounds the closely set blocks and gives the center a clear visual edge. Because there is no sashing, the border is the main element separating the block field from the outside of the quilt. Its effect will change depending on how it relates to the two fabrics used in the center.
How the straight-grid layout is put together
The measured design is based on 960 blocks arranged in a straight grid. Each block aligns with the blocks above, below, and beside it. There are no sashing strips interrupting the rows or columns, so the accuracy and consistency of the repeated block placement contribute directly to the overall appearance.
For sewing, you can plan an assembly order that helps you keep the two fabrics in their intended positions. The design does not require a particular piecing sequence, so use the method that makes the dense grid easiest for you to track. Working from a visual reference can help you check the arrangement as sections of the quilt center come together.
Once the block field is assembled, the border frames it. The page’s measured facts give you the finished size and structural details without prescribing cutting or construction methods that may depend on your fabric, preferred seam allowance, and workflow. If you are exploring other block structures before starting, browse the quilt block index.
Throw size and project fit
At 60 × 72 inches, the Quiltler Quilt is approximately a throw quilt. It can work as a generously sized quilt for a sofa, reading chair, or layered use around the home. If you plan to place it on a bed, compare the finished measurements with your mattress and decide how much coverage or drape you want. The design is identified as a throw rather than a specific bed size.
The straight setting and two-fabric palette make the overall plan easy to understand. However, the 960-block count means the project still calls for careful organization and repeated piecing. A newer quilter may appreciate the regular grid, while a more experienced quilter may enjoy working with repetition and testing how two fabrics behave across many closely set blocks.
Skill fit depends on more than the visual layout. Consider how comfortable you are keeping repeated units consistent, tracking fabric placement, and joining a large grid without sashing. Reviewing the full design before cutting can help you decide whether to make it as shown or resize it to better match your preferred project scope.
Recolor the two fabric roles
Because this quilt uses two distinct fabrics, recoloring it begins with two clear fabric roles. Open the design in the Quiltler studio, select alternatives for those roles, and compare how the entire grid changes. You can test differences in color, value, or print without redrawing all 960 blocks.
A higher visual contrast may make the repeated layout more distinct, while fabrics that are closer in appearance may let the grid read as a more unified surface. These are design choices rather than requirements. The useful approach is to compare your options across the full quilt, including the border, instead of judging the fabrics only as individual swatches.
If you are planning from fabric you already own, photograph your stash for use while exploring the design. You can also consult the fabric calculator when you want a separate fabric-planning reference. Always base purchases and cutting on the final version you intend to make.
Resize while keeping the design in view
You can use the Quiltler workspace to explore a different finished size while keeping the original 60 × 72 inch version as your reference. Resizing may change the amount of fabric needed and the way the grid relates to the border, so review the whole composition after each adjustment rather than considering dimensions alone.
If you want a smaller project, decide which parts of the original structure matter most to you: the dense straight grid, the two-fabric relationship, the absence of sashing, or the framing border. For a larger version, check that the repeated layout still gives you the visual balance you want. Any edited version should be treated as a new plan rather than assumed to retain the original measurements.
For more guidance on moving from an idea to an editable plan, read how to design quilts. You can also browse the quilt gallery to compare this regular grid with other types of quilt layouts.
Make this quilt in Quiltler
Open this specific design and use its existing measurements, block grid, fabric roles, and border as your starting point.
- Open the Quiltler Quilt Launch the live Quiltler Quilt design. The workspace opens with the existing 60 × 72 inch throw layout.
- Review the original structure Before editing, inspect the 960-block straight grid, the two fabric roles, the lack of sashing, and the border. This gives you a clear reference for comparing later changes.
- Try two fabrics from your plan Replace the design’s fabric roles with colors or fabric images you are considering. Look at the whole grid to judge how clearly the two choices relate to one another.
- Check the border with the new colors Review how the border frames your recolored block field. Since the center has no sashing, the border has a strong role in defining the outside edge of the composition.
- Test a different finished size Adjust the project size if the original throw dimensions do not fit your intended use. Review the resulting grid, border, and updated planning information after resizing.
- Return to the original for comparison Compare your edited version with the original 60 × 72 inch design. Confirm that the finished size, fabric choices, and repeated layout support the quilt you want to make.
Try it yourself
Quiltler Quilt
Open the live Quiltler Quilt to work from the existing 960-block grid. Recolor its two fabric roles, review the border, or adapt the throw dimensions for your project.
Photograph fabrics from your own stash and watch the yardage information update as you edit the design.